0%

工厂方法指的是 创建接口类实例的接口
工厂方法的核心在于 将所依赖的接口的实例化延迟到 子类

框架使用抽象类定义和维护对象之间的关系,于是框架中的某些顶层抽象类 并没有 能够实例化 其所依赖的接口类的能力–所以该顶层抽象类只能将 实例化 某些接口类 的方法 委托给自己的子类(那些有足够信息的子类)去实现这些接口

实例

如下的 IMachine::CreateComps 就是 工厂方法,没有定义返回值或者没有参数影响创建结果并不影响这是 工厂方法(见CMaine:::CreateComps 直接影响到 compA 和 compB 成员不是一样的么)

1
2
3
4
5
6
7
8
9
10
11
12
13
14
15
16
17
18
19
20
21
22
23
24
25
26
27
28
29
// 框架接口层
struct IComp{
virtual void StartWork()=0;
};
struct IMachine{
virtual void StartAllComps{
CreateComps();
compA->StartWork();
compB->StartWork();
}
virtual void CreateComps()=0;
private:
IComp * compA,compB;
}

// 框架实现
struct CCompA:IComp{
void StartWork()override{}
};
struct CCompB:IComp{
void StartWork()override{}
};

struct CMachine:IMachine{
virtual void CreateComps()override{
compA = new CCompA;
compB = new CCompB;
}
}

另一方面,假如顶层抽象类有 对工厂方法的缺省实现,这个时候,工厂方法的存在就是对组件的扩展的支持—允许子类重载工厂方法

相关 设计模式

  • 模版模式:工厂模式也像 模版模式,由顶层类定义一部分行为,将对象创建这个过程留待子类实现
  • 抽象工厂方法:

延伸

连接平行类层次

当一个类将它的一些职责委托给一个独立的类的时候,就产生了平行类层次。考虑可以被交互操纵的图形;也就是说,它们可以用鼠标进行伸展、移动,或者旋转。实现这样一些交互并不总是那么容易,它通常需要存储和更新在给定时刻刻记录操纵状态的信息,这个状态仅仅在操纵时需要。因此它不需要被保存在图形对象中。此外,当用户操纵图形时,不同的图形有不同的行为。例如,将直线图形拉长可能会产生一个端点被移动的效果,而伸展正文图形则可能会改变行距。

有了这些限制,最好使用一个独立的 Manipulator 对象实现交互并保存所需要的任何与特定操纵相关的状态。不同的图形将使用不同的 Manipulator 子类来处理特定的交互。得到的 Manipulator 类层次与 Figure 类层次是平行(至少部分平行),如下图所示。

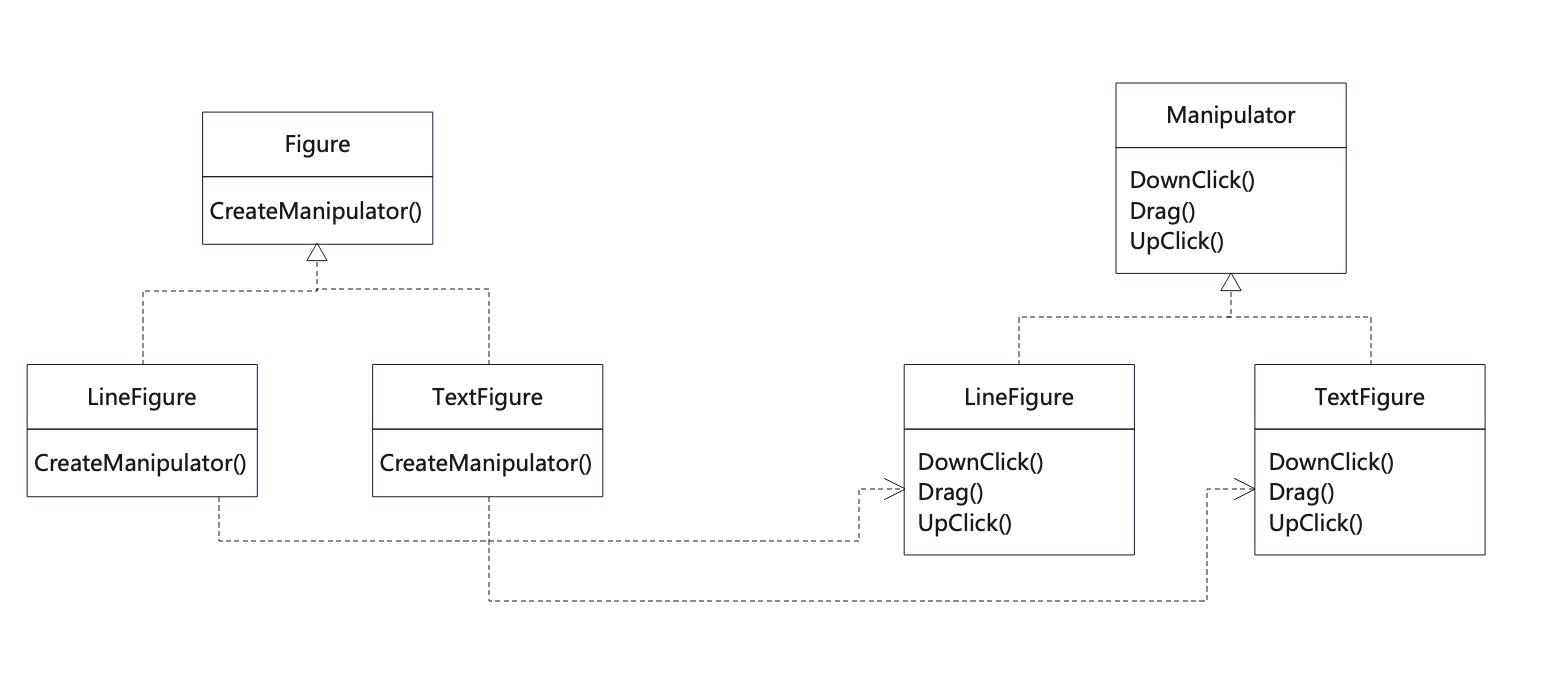
Figure 类提供了一个 CreateManipulator 工厂方法,它使得客户可以创建一个与 Figure 相对应的 Manipulator。Figure 子类重定义该方法以返回一个合适的 Manipulator 子类实例。做为一种选择,Figure 类可以实现 CreateManipulator 以返回一个默认的 Manipulator 实例,而 Figure 子类可以只是继承这个缺省实现。这样的 Figure 类不需要相应的 Manipulator 子类——因此该层次只是部分平行的。

注意工厂方法是怎样定义两个类层次之间的连接的。它将哪些类应一同工作工作的信息局部化了。

find

正则查找
find -regex “<>”

忽略大小写查找文件
find -iname ***

符号查找

静态库
nm libxvidcore.a
-n: sort
-u undefined-only

剪贴板 xclip

复制内容到剪贴板
echo “hello xclip” | xclip -selection c

建立别名
alias clip=”xclip -selection c”

版本管理 update-alternatives

update-alternatives

1
2
3
4
5
6
7
8
9
10
#命令最后的1和10是优先级,如果使用auto选择模式,系统将默认使用优先级高的
#假设只安装了GCC/G++ 7和11版本
sudo update-alternatives --remove-all gcc
sudo update-alternatives --remove-all g++

sudo update-alternatives --install /usr/bin/gcc gcc /usr/bin/gcc-7 1
sudo update-alternatives --install /usr/bin/gcc gcc /usr/bin/gcc-11 10

sudo update-alternatives --install /usr/bin/g++ g++ /usr/bin/g++-7 1
sudo update-alternatives --install /usr/bin/g++ g++ /usr/bin/g++-11 10

忽略输出

startkde >/dev/null 2>&1

Install Specific Package Version With Apt Command in Ubuntu

sudo apt install package_name=package_version

add user to sudo group

usermod -G sudo lull

check groups

cat /etc/group

if not in the sudoers file

https://blog.csdn.net/weixin_49192027/article/details/114702099

添加文件
/etc/sudoers.d/lull

1
lull ALL=(root,lull) ALL

Ubuntu-18.04 install GCC11

link

1
2
3
4
5
6
7
8
9
10
11
12
13
14
15
16
17
18
19
20
21
22
23
24
25
add-apt-repository ppa:ubuntu-toolchain-r/test
sudo apt update
sudo apt install gcc-11 g++-11

#使用locate命令比find快一些,使用前最好更新一下索引
sudo updatedb && sudo ldconfig
locate gcc | grep -E "/usr/bin/gcc-"
#如果locate不能用
ls /usr/bin/gcc*
ls /usr/bin/g++*

#命令最后的1和10是优先级,如果使用auto选择模式,系统将默认使用优先级高的
#假设只安装了GCC/G++ 7和11版本
sudo update-alternatives --remove-all gcc
sudo update-alternatives --remove-all g++

sudo update-alternatives --install /usr/bin/gcc gcc /usr/bin/gcc-7 1
sudo update-alternatives --install /usr/bin/gcc gcc /usr/bin/gcc-11 10

sudo update-alternatives --install /usr/bin/g++ g++ /usr/bin/g++-7 1
sudo update-alternatives --install /usr/bin/g++ g++ /usr/bin/g++-11 10

gcc --version

g++ --version

处理wsl与windows的code冲突

原生code使用wsl的code

1
2
3
4
# ~/.profile
alias code=/usr/bin/code
# 使用软链接使用windows code,
ln -s "/mnt/c/Users/lull/AppData/Local/Programs/Microsoft VS Code/bin/code" wcode

grep regex replace

perl-regex lookaround

https://learnbyexample.github.io/learn_gnugrep_ripgrep/perl-compatible-regular-expressions.html

Lookarounds helps to create custom anchors and add conditions to a pattern. These assertions are also known as zero-width patterns because they add restrictions similar to anchors and are not part of matched portions (especially helpful with -o option). These can also be used to negate a grouping similar to negated character sets. Lookaround assertions can be added to a pattern in two ways — lookbehind and lookahead. Syntax wise, these two ways are differentiated by adding a < for the lookbehind version. The assertion can be negative (syntax !) or positive (syntax =).

Syntax Lookaround type
(?!pattern) Negative lookahead
(?<!pattern) Negative lookbehind
(?=pattern) Positive lookahead
(?<=pattern) Positive lookbehind
1
2
3
4
5
6
7
8
9
10
11
12
13
14
15
16
17
18
19
20
21
22
$ # extract whole words only if NOT preceded by : or -
$ # can also use '(?<![:-])\b\w++'
$ echo ':cart<apple-rest;tea' | grep -oP '(?<![:-])\b\w+\b'
apple
tea

$ # note that end of string satisfies the given assertion
$ # 'bazbiz' has two matches as the assertion doesn't consume characters
$ echo 'boz42 bezt5 bazbiz' | grep -ioP 'b.z(?!\d)'
bez
baz
biz

$ # extract digits only if it is followed by ,
$ # note that end of string doesn't qualify as this is positive assertion
$ echo '42 foo-5, baz3; x-83, y-20: f12' | grep -oP '\d+(?=,)'
5
83
$ # extract digits only if it is preceded by - and not followed by ,
$ # note that this would give different results for greedy quantifier
$ echo '42 foo-5, baz3; x-83, y-20: f12' | grep -oP '(?<=-)\d++(?!,)'
20

grep regex match with only print matching

1
2
# print all codeblocks child-project path
cat xxx.workspace |grep -P '(?<=Project filename=")[^"]+' -o

Iogl.02.ColorPie

steps:

  • create cpu frames
  • cpu render pixel in it
  • cuda copy frame to opengl texture
  • opengl render this frame

render

1
2
3
4
5
6
7
8
9
10
11
12
13
14
15
16
17
18
19
20
21
22
23
24
struct FragParam
{
double time;
int w, h;
int razerR = 1, razerC = 1;
double radiusOfRazer = 0.5;
int ROffset = 0, COffset = 0;
};

tuple<uint8_t, uint8_t, uint8_t, uint8_t> FragRender(int r, int c, FragParam const param)
{
double w = param.w, h = param.h;
r += param.ROffset;
c += param.COffset;
if (((r / h - 0.5) * (r / h - 0.5) + (c / w - 0.5) * (c / w - 0.5)) > param.radiusOfRazer * param.radiusOfRazer)
{
r = r / param.razerR * param.razerR;
c = c / param.razerC * param.razerC;
}
int factor = 256;
int red = factor * r / h;
int green = factor * c / w;
return {red, green, 0, 1};
}

trans data from cpu to gpu

call cuMemcpy2D to transform data
there is a weired problem still unresolved:
if i dont call glGenerateMipmap(tex), then the luminance of pixels is decreasing with the vertex-data:position.
like(dont call genMipmap) : set L=-0.7,R=0.7;then the rendered frame luminance is about 0.55x of the true pixel-data;

1
2
3
4
5
6
7
8
9
10
11
12
13
14
15
16
17
18
19
20
21
22
23
24
25
26
27
28
void TransHostData(void *data, size_t sz)
{
NV_API_CALL(cuGraphicsMapResources(1, &texRes, 0));
// // this is for texture object
// NV_API_CALL(cuGraphicsResourceGetMappedPointer(&texResDevicePtr, &texResDevicePtrLength, texRes));
// RAW_LOG_ASSERT(CULogger(), "MemCpy", texResDevicePtrLength >= sz,);
// NV_API_CALL(cuMemcpy(texResDevicePtr, (CUdeviceptr)data, sz));

NV_API_CALL(cuGraphicsSubResourceGetMappedArray(&texResArr, texRes, 0, 0));
CUDA_MEMCPY2D cp{};
cp.srcMemoryType = CUmemorytype::CU_MEMORYTYPE_HOST;
cp.srcHost = data;
cp.srcPitch = tex.width * tex_comp_cnt;

cp.dstMemoryType = CUmemorytype::CU_MEMORYTYPE_ARRAY;
cp.dstArray = texResArr;
cp.WidthInBytes = tex.width * tex_comp_cnt;

cp.Height = tex.height;

NV_API_CALL(cuMemcpy2D(&cp));
NV_API_CALL(cuGraphicsUnmapResources(1, &texRes, 0));

// /* dont know why, but after the video meemory copy, seems need regenerate this mipmap */
glActiveTexture(tex.targetTexture);
glGenerateMipmap(GL_TEXTURE_2D);
glActiveTexture(GL_TEXTURE0);
}

iogl.01.basic_OpenGL

this section is test api of Helper to create simple opengl render example, without connecting to cuda
Helper is simple wrapped utility of many things.

cuda synatx

https://docs.nvidia.com/cuda/cuda-c-programming-guide/#execution-configuration
https://blog.csdn.net/qq_39575835/article/details/83027440

block + thread

1
kernal_func<<< Dg, Db, Ns, S >>>(...);

dim3 index

calc index

1
2
3
4
5
6
7
8
9
10
11
12
13
14
15
16
int idx = (gridDim.x*gridDim.y*blockIdx.z+gridDim.x*blockIdx.y+blockIdx.x)*blockDim.x*blockDim.y*blockDim.z+ blockDim.x * blockDim.y * threadIdx.z + blockDim.x * threadIdx .y + threadIdx.x;

// or

int __device__ alphabitOrderIndex(unsigned int *str, unsigned int *base, int sz)
{
int cnt = 0;
for (int i = 0; i < sz; ++i)
{
cnt = cnt * base[i] + str[i];
}
return cnt;
};
unsigned int idxs[] = {blockIdx.z, blockIdx.y, blockIdx.x, threadIdx.z, threadIdx.y, threadIdx.x},
bases[] = {GridDim.z, GridDim.y, GridDim.x, blockDim.z, blockDim.y, blockDim.x};
int idx = alphabitOrderIndex(idxs, bases, 6);

as you can see, blockIdx is corrdinate in GridDim, threadIdx is corrdinate in blockDim, there are all dim3{int x,y,z;}

source code

deps

  • hugo: transformating markdown file to static-site html
  • nginx: handle https request

keys

hugo

config.toml

https://gohugo.io/getting-started/configuration/#all-configuration-settings

1
2
3
4
5
6
7
baseURL = 'https://www.353546.online:80/doc/'
languageCode = 'zh-cn'
title = "lull's doc"
theme = 'book'

[[cascade]]
categories = ["default cate"]

themes under ./themes

the most important thing theme provide is content&arche template
the difference between content-template & arche template: arche is for front matters of a new file; content-template is for rendering files

nginx

/etc/nginx/conf.d/default.conf

1
2
3
4
5
6
7
8
9
10
11
12
13
14
15
16
17
18
19
20
21
22
23
24
25
26
27
28
29
server {
listen 80 ssl;
server_name www.353546.online;
ssl_protocols TLSv1 TLSv1.1 TLSv1.2;
ssl_ciphers HIGH:!aNULL:!MD5;
ssl_certificate /etc/letsencrypt/live/www.353546.online/fullchain.pem;
ssl_certificate_key /etc/letsencrypt/live/www.353546.online/privkey.pem;
# listen 80;
# server_name www.353546.online;

#access_log /var/log/nginx/host.access.log main;

location / {
root /home/lull/code/doc-site/public/;
index tags/index.html tags/index.xml;
}
location /doc/ {
alias /home/lull/code/doc-site/public/;
}

#error_page 404 /404.html;

# redirect server error pages to the static page /50x.html
#
error_page 500 502 503 504 /50x.html;
location = /50x.html {
root /usr/share/nginx/html;
}
}

ssl

cert file comes from https://certbot.eff.org/ (from doc of https://letsencrypt.org/)
just use the certbot from ubuntu apt source
notice : you need a domain
the nginx ssl conf keys: ssl_certificate;ssl_certificate_key are

see https://www.digitalocean.com/community/tutorials/how-to-use-certbot-standalone-mode-to-retrieve-let-s-encrypt-ssl-certificates-on-ubuntu-20-04

1
2
privkey.pem: This is the private key for the certificate. This needs to be kept safe and secret, which is why most of the /etc/letsencrypt directory has very restrictive permissions and is accessible by only the root user. Most software configuration will refer to this as something similar to ssl-certificate-key or ssl-certificate-key-file.
fullchain.pem: This is our certificate, bundled with all intermediate certificates. Most software will use this file for the actual certificate, and will refer to it in their configuration with a name like ‘ssl-certificate’.

doc

1.下载

nothing to say

2. 创建

2.1 创建工作文件

1
2
3
4
# 管理员身份打开新安装的 部署和映像工作环境 这个脚本
# 查看帮助 ,根据你的 cpu架构,选择命令,我是amd64
copype /?
copype amd64 E:\win_amd64

2.2 自定义 winpe

dism help

win pe ocs list

使用 802.1x 身份验证协议连接到有线网络

1
2
3
# 获取你这个镜像的信息,注意传入的wim文件路径,不知道的话找一找(windows文件search推荐 everything)
# 注意获取到的 名称
Dism /Get-ImageInfo /ImageFile:E:\win_amd64\media\source\install.wim
1
2
3
4
5
6
7
8
9
10
# 挂载映像, 注意/name 的参数是上一步获取的名称
Dism /Mount-Image /ImageFile:E:\win_amd64\media\source\install.wim /Name:"Microsoft Windows PE (x64)" /MountDir:C:\test\offline

# 添加包
# 我的包路径: C:\Program Files (x86)\Windows Kits\10\Assessment and Deployment Kit\Windows Preinstallation Environment\amd64\WinPE_OCs
# 注意先添加 此路径下的包,再添加语言相关的,子目录下的相应包
cd C:\Program Files (x86)\Windows Kits\10\Assessment and Deployment Kit\Windows Preinstallation Environment\amd64\WinPE_OCs
Dism /Image:C:\test\offline /Add-Package /PackagePath:.\WinPE-Setup.cab /PackagePath:zh-cn\WinPE-Setup_zh-cn.cab /PackagePath:.\WinPE-FMAPI.cab /PackagePath:WinPE-FontSupport-ZH-CN.cab /PackagePath:WinPE-Dot3Svc.cab
# powershell 环境
Dism /Image:C:\test\offline /Add-Package /PackagePath:WinPE-WMI.cab /PackagePath:WinPE-NetFx.cab /PackagePath:WinPE-Scripting.cab /PackagePath:WinPE-PowerShell.cab

2.3 创建可启动的介质

我只做个镜像文件,稍后我会用yumi将其添加到我的多系统安装U盘上, 关于制作多系统u盘,请参见我的其他文章

1
MakeWinPEMedia /ISO E:\win_amd64 E:\winpe_amd64.iso

此导引安装 Win10,Win10-insider,Ubuntu-22.01,和Ubuntu-22.10 到同一磁盘

具体安装什么系统并不影响

我想你所需要的一些理解大概在这里:

  • ntfs home : 介绍 基本的gpt分区的一些信息
  • YUMI 多系统启动盘制作工具

前置步骤,制作多系统启动盘:

  1. 下载或制作你需要安装的系统们的镜像,此步骤我下载了U22.04U22.10,并使用windows media create tool(如果链接失效请自行到此链接下载)下载了两个镜像

  2. 预习分区
    这是我的其中一块磁盘的分区,(另一块暂未参与分区,应为当时大晚上的,没想整这么细)

分区编号 类型 大小 偏移量 用途
1 系统 100 MB 1024 KB EFI分区
2 保留 16 MB 101 MB msr保留分区
3 主要 98 GB 117 MB Win
4 主要 100 GB 98 GB Win-insider
5 未知 95 GB 198 GB Ubuntu-22.04 /
6 未知 95 GB 293 GB Ubuntu-22.10 /
7 主要 87 GB 389 GB 共享 :对ubuntu /share, 对windows随便分配个盘符咯

ubuntu(or linux)用ext4,windows用ntfs,共享区(分区7)用UDF

  1. 使用YUMI 安装windows和linux 镜像们到你的u盘

然后开始安装,这里有个细节,windows(ubuntu应该也会这样),如果有多个磁盘,windows会优先将引导信息安装到已经存在的esp分区,这意味着,如果你有俩磁盘,但是如果安装前不注意ESP的存在,那么可能系统引导就装到非预期的盘上去了

1. 安装windows就是常规安装咯
2. 安装ubuntu,安装选安装位置的时候选高级选项,按之前给的表指定你的文件系统的/和/share的挂载点(其实一般来说你应该把/home单独分区,当时/tmp,/var,/swap什么的也可以)
3. 安装第二个ubuntu,同2
4. 安装win-insider,这个只需要注意将安装位置选好在我们之前安排的分区4就好了

注意: 安装好第一个windows之后,可以用diskpar命令的子命令format 格式化UDF分区,然后在安装ubuntu们的时候在安装的时候就把UDF共享分区声明挂载,当然后来你用类似于gparted的工具再挂也一样(为什么不写fstab那些分区文件?看着头疼)

到此结束

——————– more ———————-

今天又装了 CentOS 到 磁盘到,这样子里边就有五个了哈哈哈
事实上,linux的安装在分区上只需要注意以下几个小事

  • /boot/efi 挂载到 esp分区, 多个linux系统可以一起将//boot/efi 挂载到这里
  • / 挂载到哪无所谓,但是一般来说如果把/home路径分离挂载,那么/占不了多少空间,50G算多
  • /home 可以分离挂载,这样个人数据可以恢复
  • /swap 对于不同系统来说这个分区作用和影响不大一样,swap分区需要指定分区类型为swap,centos的安装界面说swap对某些地方的性能提升很大,不过我没测试
  • /temp 原来这个分区不总是会在boot时被擦除,具体可查stackoverflow